Saturday 26 October 2013

Configuring ESXi 5.5: Enter Free License Key

In this tutorial, we will enter a free License Key on a fresh installation of ESXi 5.5, else it will expire within 60 ways. 

We are going to configure the system using the VMware vShere Client 5.5 on a windows machine.

Download VMware vShere Client 5.5

1. Enter the IP address of the ESXi 5 server in a web browser (The IP address is mentioned on the ESXi 5.5 start screen)

2. Click on 'Download vSphere Client' and install it.

Using VMware vShere Client 5.5

1. Start the VMware vSphere Client, enter the IP address of the server, login with username 'root' and the password entered during the installation process.


2. In the security waring screen, put a checkmark to install the certificate and press 'Ignore'.


3. and press 'Yes' to install the certificate


4. The vSphere Client is now started and a message will appear that the evaluation license will expire within 60 days. Press 'OK'.


Enter a free license for ESXi 5.5

1. Login on the VMware site using the credentials you entered when registering and downloading the ESXi 5.5 installer ISO.

2. Copy the key for the component "VMware vSphere Hypervisor 5 License

3. In the vSphere Client goto the 'Configuration' tab,  press 'Licensed Features' under 'Software' and click 'Edit' in the top right corner.


4. Press 'Enter Key', paste the key copied from the VMware site and press 'OK' twice.


5. The free license key is installed.


Installing ESXi 5.5

Installing ESXi 5.5 is very straightforward, execute the following tasks:

1. Boot the server with the USB stick that contains the ESXi 5.5 installer.

2. In the boot menu choose: vSphere ESXi 5.x (Interactive install):


3. In the Welcome screen press 'Enter' to continue:


4. Press 'F11' to accept the EULA and continue:


5. Select the disk to install ESXi on (I selected the USB stick that I used to boot the installer)


6. Press 'Enter' to confirm that the existing data on the USB stick will be overwritten:

7. Select the keyboard layout and press 'Enter':


8. Enter a root password (twice):


9. Confirm the installation and press 'F11':


10. When the installation is finished press 'Enter' to reboot.


11. After reboot, the ESXi 5.5 server  is started:


Friday 25 October 2013

Components arrived, the build can start

Today, I got all the parts for the new server and started the build.
See the pictures below.

1. removed the side panels from the case

2. installed the two hard drives


Western Digital 3TB NAS drives


3. installed a 80mm rear exhaust fan

4. installed the power supply

Be Quiet 300W power supply


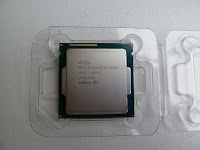
5. installed the CPU
Intel Xeon E3-1230v3


6. installed the CPU cooler
Supermicro X10SLL-F


7. installed the RAM modules
4 x 8GB ECC RAM


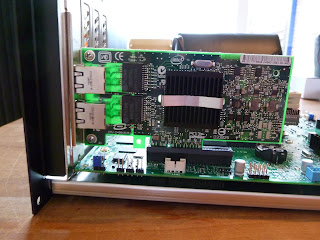
8. installed the network card
Intel® PRO/1000 PT Dual Port
Server Adapter


9. Put the motherboard tray back in the case
motherboard in case


10. Connect all the cables (left side)

10. Connect all the cables (right side)


Tuesday 22 October 2013

Creating a USB stick to boot ESXi 5.5

I planned to boot ESXi 5.5 from a USB stick and this is how I achieved it by using a windows machine:
  1. Get a USB stick, 4GB will be sufficient.
  2. Download the ESXi 5.5 installer ISO. You need to register to download the free version.
  3. Download the software package Linux Live USB Creator and install it.
  4. Insert USB stick into the computer and format it with a FAT32 file system.
  5. Start the Linux Live USB Creator.
  6. STEP1: select the USB stick.
  7. STEP2: select ISO/IMG/ZIP and select the downloaded ESXi 5.5 ISO.
  8. STEP4: deselect all options .
  9. STEP5: click on the lightning bolt to create the USB boot disk.
  10. When finished the tool will tell you that “Your LinuxLive key is now up and ready”.

On my machines the ESXi installer will hang while loading the installer on file "LSI_MR3.V00". Seem it has to do with RAID, but I do not need it on the host anyway. This is the fix:

  1. Remove the file 'LSI_MR3.V00' from the root folder on the USB stick
  2. Make a copy of the file 'LSI_MSGP.V00' and rename it to 'LSI_MR3.V00'

Put the USB stick into the machine that you want to install ESXi 5.5 on and boot it from this USB stick.

Monday 21 October 2013

What about building a ESXi 5.x server?

Recently, I’ve been looking at VMware to determine what it would take to run my little ‘datacenter’ using ESXi. I experimented a while with running ESXi 5.5 on my laptop and desktop, booting from a USB Stick, setting up iSCSI for the VM datastore, configuring VMDirectPath I/O pass-through (of a firewire PCI card for my DVB tuners) and moving some of my current Hyper-V virtual machines to ESXi.

But what hardware should I choose? Go for another build using consumer components or go for server hardware? I always thought that it would cost a fortune to use server components, but only the motherboard is a bit more expensive.

The current system has 16GB of RAM and with the 13 virtual machine that I’ve put on there, not much room to spare. In the new system I will double it to 32GB.

I always take the most recent technology for my builds, so I’ll be looking for a ‘Haswell’ intel Xeon processor.

The motherboard has to support ECC RAM and the ability to have four PCIe 1GB NICs and room for the PCIe firewire card (for the DVB tuners).

The server does not really have to get any hard drives (I will boot it from a USB stick) and the VM datastore will be located on another machine, but I decided to get some drives for it anyway. Building this new host with the same functionality as the current system will take some time and both systems will run in parallel for a while. I will convert my current server into a file server running FreeNAS later and the new server also has to run independently while building the FreeNAS system. I can re-use the hard drives in the ESXi host as backup for the VM datastore and the other data that needs to be backed-up from the NAS.

Yesterday, I ordered the following components for the new ESXi system:


Description
Vendor
Price (euros)
Case
Lian-Li PC-V335 (uATX)
102,17
Motherboard
Supermicro X10SLL-F
159,26
CPU
Intel Xeon E3-1230v3
227,42
CPU Cooler
Noctua NH-L9i
36,91
Memory
4x 8GB Kingston ValueRam KVR16E11/8i
329,46
Power supply
Be Quiet System Power 7 300W
33,92
HDD - intern
2x Western Digital RED WD30EFRX – 3TB
239,80
NIC
2x Intel Pro 1000PT Dual Port 1Gbit
88,00
USB Stick
2x Bestmedia Platinum Slider
15,70
Cat 5e Patch
2x C2G Cat 5e patch cable 2m
7,76
Cat 5e Cross
2x C2G Cat 5e crossover cable 2m
15,36

Remarks:

·        The supermicro board contains two 1 Gbit NICs and I will add one of the Dual port NICs. I will put the other one in the existing system (the future NAS) to create a multipath iSCSI connection between the two systems. 


My Current Home Server

Three years ago I build a virtualized home server based on Microsoft Hyper-V. It serves ‘production’ tasks in my home, but is also used for experimenting with new technologies. The host system is Windows Server 2008 R2 and runs about 13 virtual machines (see below):

HOST
OS
Description
--
Windows Server 2008 R2
Argus TV recorder, Veeam 7, Print server, file server
HYPER-V VM
OS
Description
Firewall
Centos 6.x
Shield the Linux servers from the LAN
Reverse Proxy
Centos 6.x
Proxy server between Internet en webservers
Fileserver
Centos 6.x
Samba server and OpenLDAP
Webserver1
Centos 6.x
Subsonic, Piwigo, Owncloud
Webserver2
Centos 6.x
Calibre, xrdp, KDE desktop
Webserver3
Centos 6.x
Joomla
Application server
Centos 6.x
AWStats
Download server
Centos 6.x
Sickbeard, Couchpotato, SABnzd, Spotweb
VPN server
Centos 6.x
PPTP
Windows desktop
Windows 7
Bittorrent, Airplayit
TV Server
Windows Server 2012
Argus TV scheduler, EPG grabber
Domain server
Windows Server 2008 R2
Active Directory, DNS
Mail server
Windows Server 2008 R2
Exchange Server 2010


This is the detailed configuration:


Case
Antec Twelve Hundred
Motherboard
Gigabyte GA-880GA-UD3H
CPU
AMD Phenom II X6 1055T
CPU Cooler
Arctic Cooling Freezer 13
Memory
16GB: 4x 4GB Corsair XMS3 DDR3 - 1333 MHz / PC3-10666 - CL9
Power supply
Antec TruePower New TP-750
HDD - intern
5x WesternDigital Caviar Green WD10EARS - 1TB
HDD - intern
WesternDigital WD20EADS - 2TB
HDD - intern
WesternDigital WD2500KS – 256GB
HDD - intern
Seagate ST3250823AS – 256GB
HDD – extern
Platinum MyDrive USB 3 – 2TB
Optical drive
LiteOn iHDP118 - DVD-ROM
Firewire
PCI card – 3x firewire
DVB tuner
2x FloppyDTV Cable